
|
Setting up your email
Create a mailbox for your own domain, like hello@mybusiness.nz, then add it to your email application eg. Outlook for windows, your Android phone email or iPhone email. It only takes a few minutes.
|
Before you start
Your domain needs an email or web hosting plan. If it doesn't have one yet:
- Open the Domain Manager.
- Find your domain and, on the right of its row, click the dashed plus button + (it says “Get web hosting & email”).
- Pick a plan and pay — your email switches on straight away.
Step 1 — Create your email address
There are two ways to do it. Pick whichever you prefer — they create exactly the same mailbox.
|
Easiest
Ask your personal assistantClick your personal assistant on any page and type what you want, for example “Create hello@mybusiness.nz with a strong password”. It creates the mailbox and gives you the password. |
Do it yourself
Domain ManagerUse the Mailboxes button on your domain's hosting row to create the address and choose your own password. |
Using the personal assistant
- Log in and click your personal assistant (bottom right of any page).
- Tell it the address you want, e.g. “Create hello@mybusiness.nz”.
- Choose a password, or ask it to make a strong one for you.
- Save the password somewhere safe — you'll need it in Step 2.
Using the Domain Manager
- Log in and open the Domain Manager.
- Find your domain and, on its hosting row, click Mailboxes. Your email control panel opens.
- Click Create, type the part before the @ (for example hello) and choose a password.
- Click Create again. Your new address is ready — save the password for Step 2.
Your email settings
Keep these handy for Step 2. Replace mybusiness.nz with your own domain.
| User name | Your full email address, e.g. hello@mybusiness.nz |
| Password | The mailbox password from Step 1 (the same for incoming and outgoing) |
| Incoming mail (IMAP) — recommended | Server mail.mybusiness.nz · port 993 · security SSL/TLS |
| Incoming mail (POP) — only if you need it | Server mail.mybusiness.nz · port 995 · security SSL/TLS |
| Outgoing mail (SMTP) | Server mail.mybusiness.nz · port 465 · security SSL/TLS · sign-in required (same user name and password) |
| Want the exact settings for your mailbox? Ask your personal assistant, for example “What are the email settings for hello@mybusiness.nz?” — it looks them up for you. |
IMAP or POP — which should I choose?
Your email app will ask you to choose. Pick IMAP unless you have a reason not to.
|
IMAP — recommended Your email stays on our server and every device shows the same thing. Read a message on your phone and it's marked as read on your computer too. Sent and deleted messages stay synchronised everywhere. |
POP Your email is downloaded to one device and usually removed from the server. It suits a single computer, but your phone and computer won't match, and if that device is lost, so is your email. |
Step 2 — Add your email to your device
Outlook on Windows (the new Outlook)
|
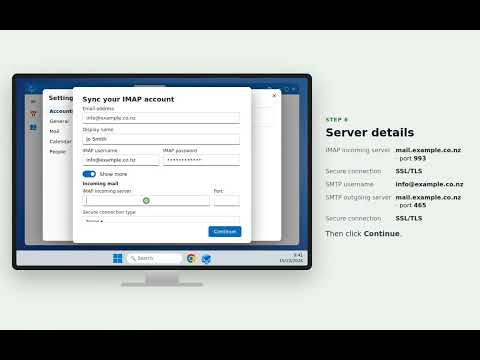
- Open Outlook, click the Settings cog (top right), then Accounts → Email accounts → Add account.
- Type your email address and click Continue.
- When asked for the account type, choose IMAP.
- Enter your password, then click Show more and fill in the incoming and outgoing servers from “Your email settings” above.
- Click Continue. Outlook checks the details and adds your mailbox.
Outlook on Windows (classic Outlook)
|
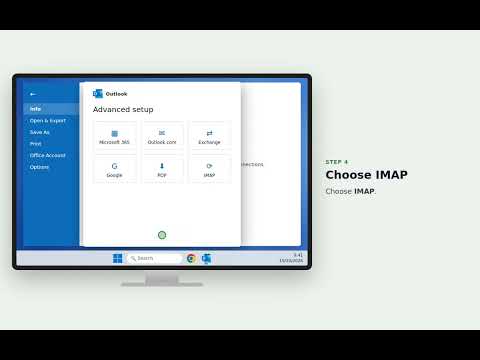
- Open Outlook and click File → Add Account.
- Type your email address, click Advanced options, tick Let me set up my account manually, then click Connect.
- Choose IMAP.
- Fill in the incoming server (port 993, SSL/TLS) and outgoing server (port 465, SSL/TLS) from “Your email settings”, then click Next.
- Enter your password, click Connect, then Done.
Android (Gmail app)
Most Android phones use the Gmail app for all email, not just Gmail addresses.
|
- Open the Gmail app, tap your profile picture (top right) and choose Add another account.
- Tap Other, type your email address and tap Manual setup.
- Choose Personal (IMAP), then enter your password and tap Next.
- Incoming server: user name = your full email address, server mail.mybusiness.nz, port 993, security SSL/TLS. Tap Next.
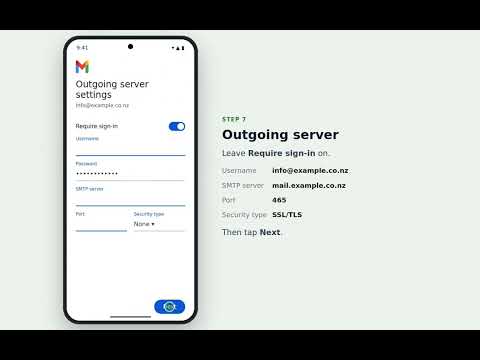
- Outgoing server: leave Require sign-in on, server mail.mybusiness.nz, port 465, security SSL/TLS. Tap Next.
- Choose how often to check for mail, give the account a name and tap Next. Done.
Using the Samsung Email app instead? The steps are almost the same: Add account → Other → Manual setup → IMAP account.
iPhone (Mail app, iOS 26)
|
- From the Home Screen, open Settings, scroll down and tap Apps, then Mail.
- At the top, tap Mail Accounts → Add Account.
- Type your email address and tap Next.
- Tap Add Other Account, then Mail Account.
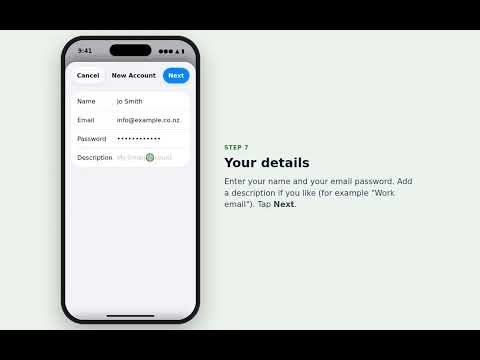
- Enter your name, email address, password and a description (e.g. Work email), then tap Next.
- Choose IMAP. Under Incoming Mail Server and Outgoing Mail Server, enter host name mail.mybusiness.nz, your full email address as the user name, and your password. Tap Next.
- Leave Mail switched on and tap Save. Open the Mail app to see your inbox.
What about webmail?
We don't offer webmail. It's an older technology and less secure than the email apps on your phone and computer, which connect to your mailbox over an encrypted connection and keep your messages synchronised across all your devices.
If it doesn't connect
- Check the user name is your full email address, not just the part before the @.
- Check the password — it's the mailbox password, not your domain.co.nz account password and it's case sensitive.
- Check the ports and security: 993 incoming and 465 outgoing, both SSL/TLS.
- Make sure outgoing mail uses the same user name and password (sign-in required).
- Still stuck? Ask your personal assistant for your exact settings, or to reset the mailbox password.
|
Stuck? We're here to help.
Click your personal assistant on any page and just ask your question in plain words, or open a Support Request from your account menu. We're happy to help you get your email going. Step-by-step live phone support is also available for a small fee.
|